
(Spanish translation to follow/traducción en español abajo)
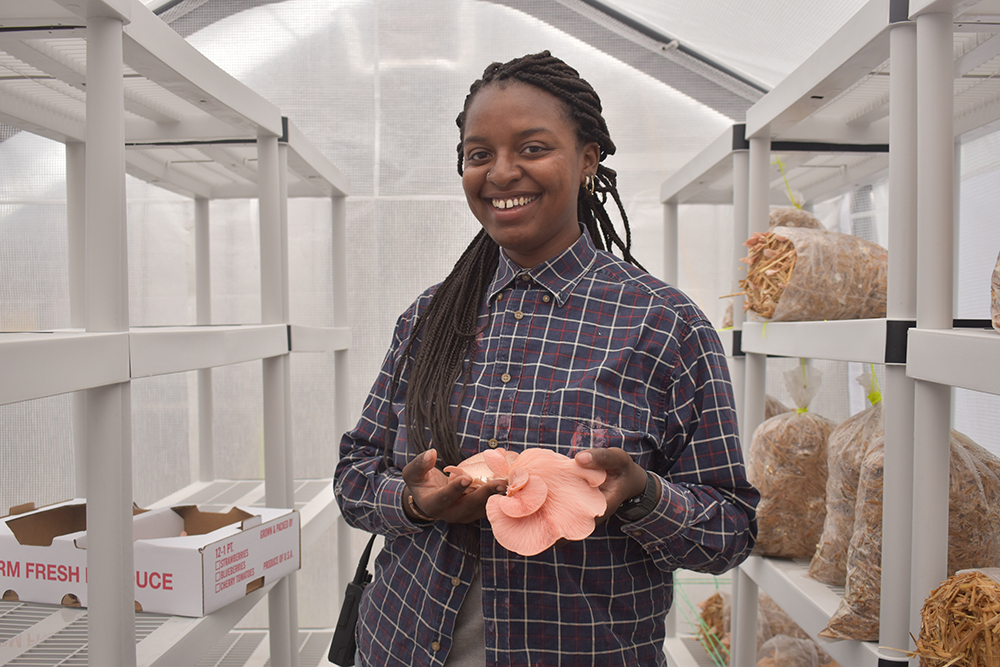
Seemingly overnight a backdrop of straw and plastic transform into an explosion of pink. Flamingo-colored mushrooms surface through an Everest of plastic bags packed with straw. There are hundreds of pink mushrooms in a wide spectrum of sizes and shapes, some of palm-sized and others as tiny as a dime.
Welcome to the mushroom project led by Nailah Marie Ellis, a farmer and member of the ProFarmer training program. Ellis officially started growing mushrooms this past spring, choosing cultivating oyster mushrooms as her key project this year. Mushroom harvesting is a first for the Farm Hub, and for Ellis a noticeable shift from last year’s project of growing strawberries.
Growing mushrooms came to Ellis as she was searching for a new project for this growing season.
She attended a speech at Stone Barns Center for Food & Agriculture by William Padilla-Brown a mycologist and contributing editor of FUNGI Magazine, who talked about the challenge of cultivating Cordyceps mushrooms, and their adaptive genetic properties. “I think that piqued my interest,” Ellis recalls. She read Mycelium Running: How mushrooms can help save the world by Paul Stamats, which spotlights the benefits mushrooms bring to the environment and ecology. She became fascinated with the role mushrooms play in agriculture and in ecology.
“They are really multifaceted and play a huge role in our ecological economy, and that’s why I was drawn to them. They are able to help the soil, and heal the earth through mycoremediation,” says Ellis referring to a form of bioremediation that uses fungi to clean the soil. The relationship between plants and mushrooms are symbiotic. An estimated 90 percent of all vascular land plants live in association with mushrooms, according to the International Plant Science Center at the New York Botanical Garden.
“I started going on mushroom walks, I went to a mushroom conference through Catskill Fungi, and I went to this mushroom retreat,” she recalls. She attended Mid-Hudson Mycological Association meetings. She collected everything she could find about mushrooms—articles, books and media posts.
She started wondering how mushrooms could fit in with farming as livelihood and began considering it in the grand scope of being a farmer. By late 2018 she committed to making cultivating oyster mushrooms her focus this growing season.

Growing mushrooms
In launching the mushroom project, Ellis immersed herself in workshops, talks and books (she has an ever-growing library), and she is mostly self-taught. She started by researching varieties of mushrooms. She chose the Djamor (pink) oyster mushroom and Pleurotus citrinopileatus (golden) oyster mushroom because they thrive in warm weather and sync well with the summer season in the Northeast. The mushrooms also lend themselves well to many culinary preparations. They are known for their meaty texture and easily adopt the flavors of the aromatics, herbs, and spices they are cooked with.
While the process of inoculation (mixing spawn with the substrate) to harvest can be quick compared to most crops (in this case 5 or 6 days), the steps and tools required are precise. Light, temperature, and humidity are essential when it comes to growing stellar mushrooms. Ellis built two small greenhouses within a greenhouse. The first is an incubation chamber that is darkened, and the second tent a fruiting chamber that allows naturally light to flow through where the mushrooms sprout and are harvested.
Other essential tools were a Humidistat (a humidity controller) that connects with the Hydrofogger Humidifier. Mushrooms thrive on humidity and ideal temperature. The incubation room needs to be 80 percent humidity and temperatures need to be between 65 degrees and 85 degrees in both tents. Success hinges on a delicate balance of oxygen level. The level of oxygen is purposefully decreased in the incubation chamber and stepped up in the fruiting chamber since it triggers the mycelium to produce mushrooms.
Problem solving
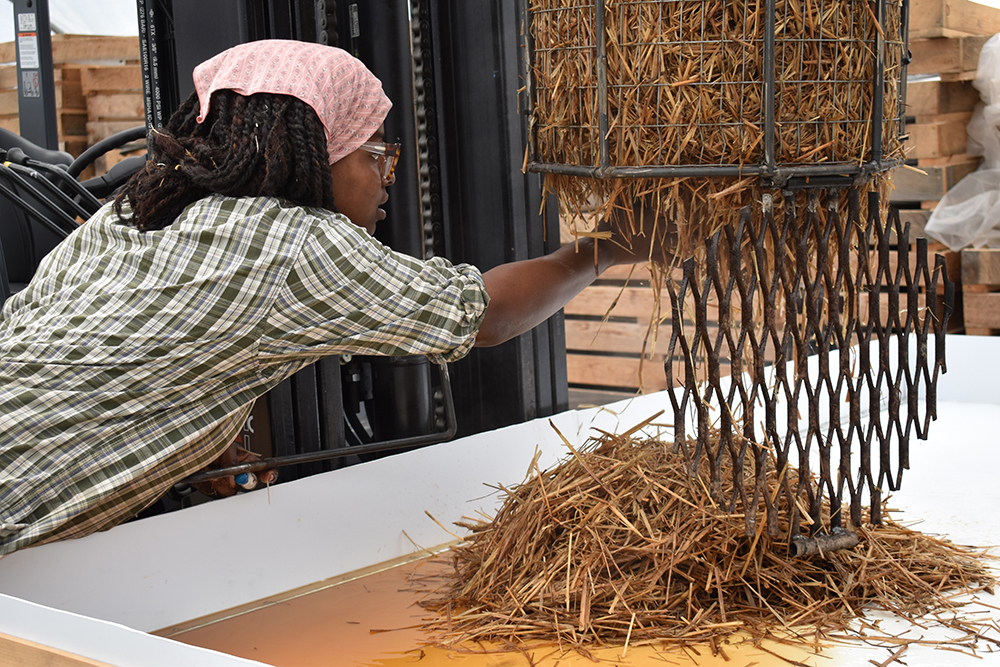
Ellis was met early on with a challenge of how to pasteurize the straw effectively and within a budget. She was limited with the kind of equipment she could buy. A solution was to build a metal basket to hold the pasteurized straw, which would serve as a base to be mixed with the spawn. After the straw is packed into the basket it is lowered into water that has been heated to 170 degrees.
She built the table where the straw would fall from the metal basket and be mixed with the spawn. She purchased bags of certified organic mushroom grain spawn from Field & Forest Products. In this case, Ellis used straw as a substrate, which is the substance upon which the mycelium grows. The substrate depending on the kind of mushroom being grown can include everything from wood chips and saw dust to logs.
The straw was previously chopped and baled in preparation for pasteurization. She slit holes in the polypropylene plastic bags giving space for the mushrooms to grow. Then she layered each bag lasagna fashion with one layer of spawn and the next of straw, so the mycelium has easier access to the nutrition-enriched substrate.

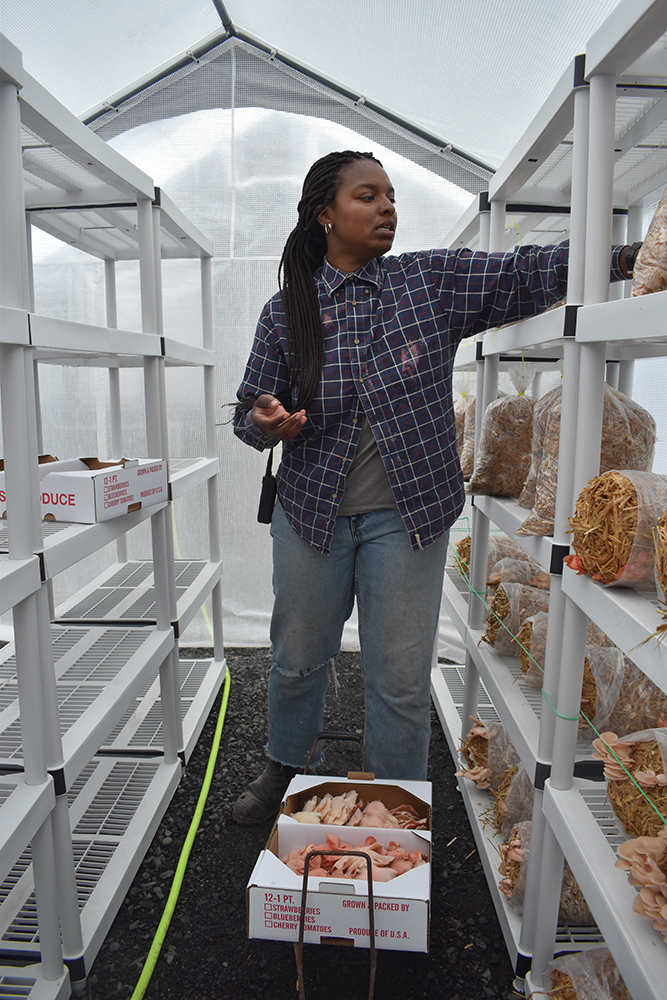
The bags were placed in the dark tent for 10 to 13 days before being moved to the fruiting chamber where the harvest occurs. Most bags explode with mushrooms after five days, and by the sixth day they are ready for harvest.
Ellis estimates she can pack 30 bags in a day with every bag of spawn creating up to 17 bags when combined with the straw. Every bag can generate dozens of mushrooms. In between inoculating and harvesting, Ellis can be found in the greenhouse buried in books and articles about mushroom growing. In the greenhouse there is also a large white board that is telling of her passion. On there is an ever-growing collage of cut out articles about mushrooms, drawings, photos and renderings of mushrooms. On a pink Post-it there are the words, “Millennial Pink,” a color made popular through social media and pop culture.
“It was added bonus that they (the mushrooms) were a vibrant color,” she says.
First harvest
By the second week of June Ellis was busy harvesting mushrooms. She picked off the layers of mushrooms that had burst through the plastic slits. The ideal Djamor mushroom is a deep pink and palm-sized with wavy edges that curl down. Less ideal are the ones with the caps that are curled up. Many of Ellis’s mushrooms were bright pink and palm sized.
Strawberries also continue to play a critical role Ellis’ learning and experimenting. On the ground in the greenhouse is a makeshift garden, where Ellis is growing strawberries and wine cap mushrooms side by side to see whether they thrive when grown in tandem. This is part of Ellis’ exploration into intercropping, which involves planting complementary plant species in close proximity with one another for a synergistic effect. Considering most fruit don’t like to have their soil distracted, Ellis is interested in what effects one has on the other and vice versa. The mushroom project will run through October with Ellis’s planning to inoculate on a weekly basis. As the weather cools, she plans to shift to cooler varieties of oyster mushrooms.
A greater question, especially considering the flush of mushrooms, is what is next. She is working with Jeff Scott, the marketing and logistics coordinator, on a distribution plan for the mushrooms. She recently started selling some at the Kingston YMCA Farm Project’s Farm Stand.
Some have already been donated, and Ellis continues to use them in the cooking classes she teaches as part of her volunteer work at the Kingston YMCA Farm Project.
She finds that every day she is learning something new about growing mushrooms.
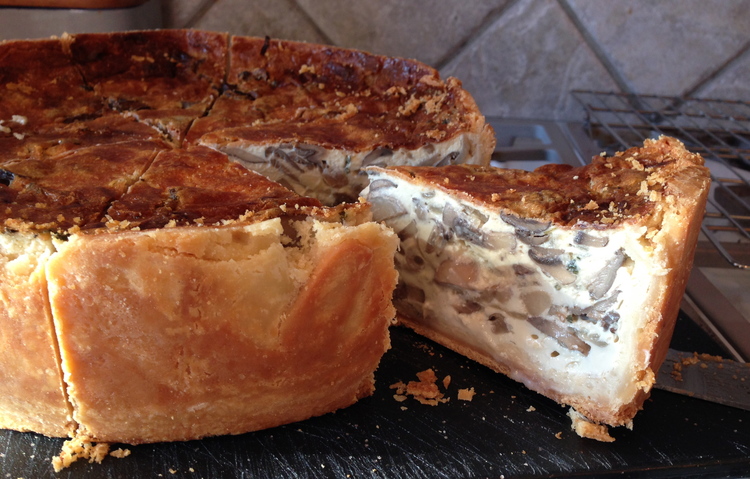
“So far, I like it, and it’s something I could see myself doing. I think there’s just been a lot of problem solving which I really enjoy,” she says. Besides growing them, she likes eating them. “I like quiche risotto, pizza, and pasta and it goes well with everything. Mushrooms and eggs are my favorite, especially sautéed up,” she smiles.
– Amy Wu
MUSHROOM VOCABULARY
Inoculate: the process of introducing mushroom spores to a substrate.
Substrate: any substance where mycelium will grow. Depending upon the variety of mushroom this includes wood logs, saw dust, corn, straw and even toilet paper rolls.
Mycelium: the vegetative body for fungi that produce mushrooms.
Spawn: a smaller amount of a nutritious material, examples include straw, enriched saw dust and logs, upon which the mycelium can begin to grow before it’s ready to colonize a substrate.
Sources: North American Mycological Association
NAILAH’S RECOMMENDED RECIPE
The following is one of Nailah’s favorite mushroom recipes.
https://www.epicurious.com/recipes/member/views/thomas-keller-mushroom-quiche-50188683
YIELD: 12 Servings
INGREDIENTS
1 tablespoon vegetable oil
1 pound oyster mushrooms, stems trimmed and large caps halved or quartered
1 pound white mushrooms, thinly sliced
Salt and freshly ground white pepper
1 tablespoon unsalted butter
2 small shallots, minced
1 tablespoon thyme, chopped
3/4 cup shredded Comté or Emmental cheese (2 1/2 ounces)
1 Recipe Thomas Keller Buttery Pastry Shell
2 cups milk
2 cups heavy cream
6 large eggs, lightly beaten
Freshly grated nutmeg
PREPARATION
- Preheat the oven to 325°. In a very large skillet, heat the oil. Add the oyster and white mushrooms, season with salt and pepper and cook over high heat, stirring, until starting to soften, about 5 minutes. Reduce the heat to moderate. Add the butter, shallots and thyme and cook, stirring often, until the mushrooms are tender, about 12 minutes longer. Season with salt and pepper and let cool.
- Scatter 1/4 cup of the cheese and half of the mushrooms evenly over the bottom of the Buttery Pastry Shell. In a blender, mix half each of the milk, cream and eggs and season with 1 1/2 teaspoons of salt, 1/8 teaspoon of pepper and a pinch of nutmeg at high speed until frothy, about 1 minute. Pour the custard into the pastry shell. Top with another 1/4 cup of cheese and the remaining mushrooms. Make a second batch of custard with the remaining milk, cream and eggs, plus the same amount of salt, pepper and nutmeg as before and pour into the shell. Scatter the remaining 1/4 cup of cheese on top.
- Bake the quiche for about 1 1/2 hours, or until richly browned on top and the custard is barely set in the center. Let cool in the pan until very warm.
- Using a serrated knife, cut the pastry shell flush with the top of the pan. Carefully lift the springform pan ring off the quiche. Cut the mushroom quiche into wedges, transfer to plates and serve warm. MAKE AHEAD The unmolded quiche can be cooled completely, then refrigerated overnight. To serve, carefully cut the quiche into wedges, arrange on a baking sheet and bake in a 350° oven until warm, 10 minutes.
RESOURCES
“Radical Mycology: A treastise on seeing and working with fungi” by Peter McCoy
“Organic Mushroom Farming and Mycoremedia” by Tradd Cotter
Mid Hudson Mycological Association
This organization holds walks and events including the monthly mushroom speaker series.
Catskill Fungi
A business that holds a wide array of events, walks and workshops for those who are interested in learning more about mushrooms, or growing them.
Cultivo de setas: una agricultora joven descubre una nueva pasión
Aparentemente, de la noche a la mañana, un telón de fondo de paja y plástico se transforma en una explosión de rosa. Setas de color flamingo aparecen a través de las bolsas plásticas Everest llenas de paja. Hay cientos de setas rosas en un amplio espectro de tamaños y formas, algunas del tamaño de la palma de una mano y otras tan pequeñas como un centavo.
Bienvenidos al proyecto de setas liderado por Nailah Marie Ellis, agricultora y miembro del programa de capacitación ProFarmer. Ellis oficialmente comenzó a cultivar setas la primavera pasada, eligiendo cultivar setas de ostra como su proyecto clave este año. Esta es la primera vez que se cosechan setas en Farm Hub y, para Ellis, es un cambio notable del proyecto del año pasado de cultivar fresas.
El cultivo de setas llegó a Ellis mientras buscaba un nuevo proyecto para esta temporada de crecimiento.
Ella estuvo en una ponencia en Stone Barns Center for Food & Agriculture de William Padilla-Brown, micólogo y editor colaborador de FUNGI Magazine, quien habló sobre el reto de cultivar setas Cordyceps y sus propiedades genéticas adaptativas. “Creo que eso despertó mi interés”, recuerda Ellis. Ella leyó Mycelium Running: Cómo las setas pueden ayudar a salvar el mundo por Paul Stamats, que destaca los beneficios que las setas aportan al medio ambiente y la ecología. Se fascinó con el papel que juegan las setas en la agricultura y en la ecología.
“Son realmente multifacéticos y juegan un papel enorme en nuestra economía ecológica, y eso es lo que me atrajo a ellas. Son capaces de ayudar al suelo y sanar la tierra a través de la micorremediación”, dice Ellis refiriéndose a una forma de biorremediación que utiliza hongos para limpiar el terreno. La relación entre plantas y setas es simbiótica. Se estima que 90 por ciento de todas las plantas de tierras vasculares viven en asociación con setas, según el International Plant Science Center – el Centro Internacional de Ciencias Vegetales del Jardín Botánico de Nueva York.
“Empecé a hacer caminatas en busca de setas, fui a una conferencia sobre hongos a través de CatskillFungi y fui a un retiro sobre setas”, recuerda. Asistió a las reuniones de la Asociación Micológica de Mid-Hudson. Acumuló todo lo que pudo encontrar acerca de las setas: artículos, libros y publicaciones en los medios de comunicación.
Empezó a preguntarse cómo las setas podían encajar con la agricultura como sustento y comenzó a considerarlas dentro de la gran amplitud de ser una agricultora. A finales de 2018, se comprometió a hacer que el cultivo de setas de ostra fuese su enfoque esta temporada de crecimiento.
Una pizarra con la colección de artículos sobre setas, fotos e ilustraciones de Nailah.
Cultivo de setas
En el lanzamiento del proyecto de setas, Ellis se sumergió en talleres, charlas y libros (tiene una biblioteca en constante crecimiento), y es mayormente autodidacta. Comenzó investigando variedades de setas. Eligió la seta de ostra Djamor (rosa) y la seta de ostra Pleurotus citrinopileatus (oro) porque prosperan en climas cálidos y se sincronizan bien con la temporada de verano en el noreste. Las setas también se prestan bien para muchas preparaciones culinarias. Son conocidas por su textura carnosa y adoptan fácilmente los sabores de aromáticas, hierbas y especias con las que se cocinan.
Aunque el proceso de inoculación (mezclar semillas con sustrato) para cosechar puede ser rápido en comparación con la mayoría de los cultivos (en este caso 5 o 6 días), los pasos y las herramientas requeridas son precisos. La luz, la temperatura y la humedad son esenciales cuando se trata de cultivar setas estelares. Ellis construyó dos pequeños invernaderos dentro de un invernadero. El primero es una cámara de incubación al oscuro y el segundo, una carpa, es una cámara de fructificación que permite que la luz natural fluya a través de donde brotan las setas y se cosechan.
Otras herramientas esenciales fueron un Humidistat (un controlador de humedad) que se conecta con el humidificador Hydrofogger. Las setas prosperan en la humedad y la temperatura ideal. La sala de incubación debe tener 80 por ciento de humedad y las temperaturas deben estar entre 65 y 85 grados en ambas carpas. El éxito depende de un delicado equilibrio del nivel de oxígeno. El nivel de oxígeno se reduce deliberadamente en la cámara de incubación y se intensifica en la cámara de fructificación, ya que activa el micelio para producir las setas.
Solución de problemas
Ellis se encontró desde el principio con un desafío de cómo pasteurizar la paja eficazmente sin salirse de un presupuesto. Había limitaciones en cuanto al tipo de equipo que podía comprar. Una solución era construir una cesta de metal para sostener la paja pasteurizada, que servía como base para ser mezclada con los engendros. Una vez se metía la paja en la cesta, se ponía en agua calentada a 170 grados.
Construyó la mesa donde la paja cae de la canasta de metal y se mezcla con las semillas. Compró bolsas de granos de semillas de setas certificadas orgánicas de Field & Forest Products. En este caso, Ellis utilizó la paja como sustrato, que es la sustancia sobre la cual crece el micelio. El sustrato, dependiendo del tipo de seta que se cultiva, puede incluir de todo, desde virutas de madera y aserrín hasta troncos.
La paja fue previamente picada y embalada en preparación para la pasteurización. Ella cortó agujeros en las bolsas de plástico de polipropileno, creando un espacio donde las setas pudieran crecer. Luego hizo capas de bolsas, una encima de la otra como si fuera una lasaña, con una capa de semillas y la siguiente de paja, de esa manera el micelio tiene mejor acceso al sustrato rico en nutrientes.
Las bolsas fueron colocadas en la carpa oscura de 10 a 13 días antes de ser trasladadas a la cámara de fructificación donde se produce la cosecha. La mayoría de las bolsas explotan con setas después de cinco días y, para el sexto día, están listas para la cosecha.
Ellis estima que puede empacar 30 bolsas al día, y cada bolsa de semillas crea alrededor de 17 bolsas cuando se combina con la paja. Cada bolsa puede generar docenas de setas. Entre la inoculación y la cosecha, pueden encontrar a Ellis sumergida en libros y artículos sobre el cultivo de setas. En el invernadero también hay una pizarra grande que nos muestra su pasión. Allí adentro hay un collage en constante crecimiento de recortes de artículos sobre setas, dibujos, fotos y representaciones de setas. En un Post-it rosa están las palabras, “Millennial Pink”, un color popular en las redes sociales y la cultura pop.
“Fue un bono adicional que ellas (las setas) tuvieran un color vibrante”, dice.
Primera cosecha
Para la segunda semana de junio, Ellis estaba ocupada cosechando setas. Ella tomó las capas de setas que habían estallado a través de los hoyos en el plástico. La seta djamor ideal es de un rosa profundo y del tamaño de la palma de la mano, con bordes ondulados que se curvan hacia abajo. Menos ideales son las que tienen gorras que se curvan hacia arriba. Muchas de las setas de Ellis eran de color rosa brillante y del tamaño de la palma de la mano.
Las fresas todavía juegan un papel crítico en el aprendizaje y la experimentación de Ellis. En el suelo del invernadero hay un jardín improvisado, donde Ellis cultiva fresas y setas bruja marrón (que en inglés se conocen como setas de tapa de vino) lado a lado para ver si prosperan cuando se cultivan al mismo tiempo. Esto es parte de la exploración de Ellis en el intercultivo, que implica la plantación de especies vegetales complementarias en estrecha proximidad entre sí para ver si hay un efecto sinérgico. Teniendo en cuenta que a la mayoría de las frutas no les gusta tener su suelo distraído, Ellis está interesada en los efectos que el uno tiene en el otro y viceversa. El proyecto de setas se extenderá hasta octubre con la planificación de Ellis de inocular semanalmente. A medida que el clima se enfríe, piensa cambiar a variedades de setas de ostra que prosperen en climas más fríos.
Otra pregunta importante que considerar, especialmente teniendo en cuenta la cantidad de setas, es cuál es el próximo paso. Está trabajando con Jeff Scott, coordinador de Mercadeo y Logística, en un plan de distribución de setas. Recientemente, comenzó a vender algunas en un puesto de Kingston YMCA Farm Project.
Algunas ya han sido donadas y Ellis continúa utilizándolas en las clases de cocina que enseña como parte de su trabajo voluntario en Kingston YMCA Farm Project.
Ella encuentra que cada día aprende algo nuevo sobre el cultivo de setas.
“Hasta ahora, me gusta y es algo que puedo verme haciendo. Creo que he tenido un montón de resolución de problemas que realmente disfruto”, dice. Además de cultivarlas, le gusta comerlas. “Me gusta el quiche, el risotto, la pizza y la pasta, y va bien con todo. Las setas con huevo son mi plato favorito, especialmente salteadas”, sonríe.
– Amy Wu
EL VOCABULARIO DE LAS SETAS
Inocular: proceso de introducción de esporas de setas a un sustrato.
Sustrato: cualquier sustancia donde el micelio crece. Dependiendo de la variedad de setas, incluye troncos de madera, aserrín, maíz, paja e incluso rollos de papel higiénico.
Micelio: cuerpo vegetativo de los hongos que producen setas.
Engendro: cantidad pequeña de un material nutritivo, ejemplos incluyen paja, aserrín enriquecido y troncos, sobre el cual el micelio puede comenzar a crecer antes de que esté listo para colonizar un sustrato.
Fuentes: Asociación Micológica de América del Norte